How Satellite Map Camera Placement Improves CCTV Planning Accuracy
Planning a CCTV system from scratch can feel like assembling a puzzle without the picture on the box. You know you need coverage, but figuring out exactly where each camera should go often involves walking the site, climbing ladders, and making educated guesses about sightlines. Over the years I have found that the most reliable way to reduce that guesswork is to start with a good satellite view and work from there. That is where satellite map camera placement becomes a practical first step rather than just a convenience.
Satellite imagery has changed how we approach site surveys. Instead of driving to a location three times to confirm building corners and tree lines, you can pull up a high resolution image and begin marking positions right away. The key is knowing what you are looking at and understanding the limitations of the image itself. A satellite photo is not a live feed, and it is not a blueprint. It is a snapshot taken at a specific time from a specific angle, and that angle introduces what surveyors call parallax error. Tall buildings lean away from the camera sensor, shadows shift with the season, and the ground elevation you see on screen may not match what you feel under your boots. But with a little experience, you learn to read past those distortions and use the image as a solid reference.
Why Satellite Maps Work for Camera Planning
The main advantage of using satellite imagery for planning is spatial context. A floor plan tells you room dimensions but not what the roof looks like, where the neighbour’s trees cast shade at 4 PM, or whether that wall you wanted to mount a dome camera on actually faces a reflective glass facade. A satellite image shows all of that at once. When you combine that view with GIS coordinates and a map overlay, you can start placing virtual cameras with surprising accuracy.
Most planners I work with use a combination of Google Maps and OpenStreetMap for the base layer. Google Maps provides the visual detail, while OpenStreetMap gives you the vector data for roads, building outlines, and property boundaries. That mix is useful because satellite imagery providers like Maxar and other Earth observation companies update their libraries at different frequencies. A Maxar image might be six months old while a Bing Maps tile is from last week. Cross-referencing them helps you spot changes that could affect your camera positions, like a new construction crane blocking a sightline or a row of hedges that has grown tall enough to hide a walkway.
Working with Coordinates and Scale
Once you have your map layer set, the next step is to drop markers at the spots where you think cameras should go. This is where understanding map scale matters. Zoom in too far and you lose context; zoom out too much and you cannot distinguish a door from a window. I usually start at a scale where one pixel represents about half a metre. That gives enough detail to see individual parking spaces and entrance steps without getting lost in roof texture. From there I drop placeholders and note the GIS coordinates for each one. Later, when I walk the site, I can confirm those coordinates with a handheld GPS unit and adjust as needed.
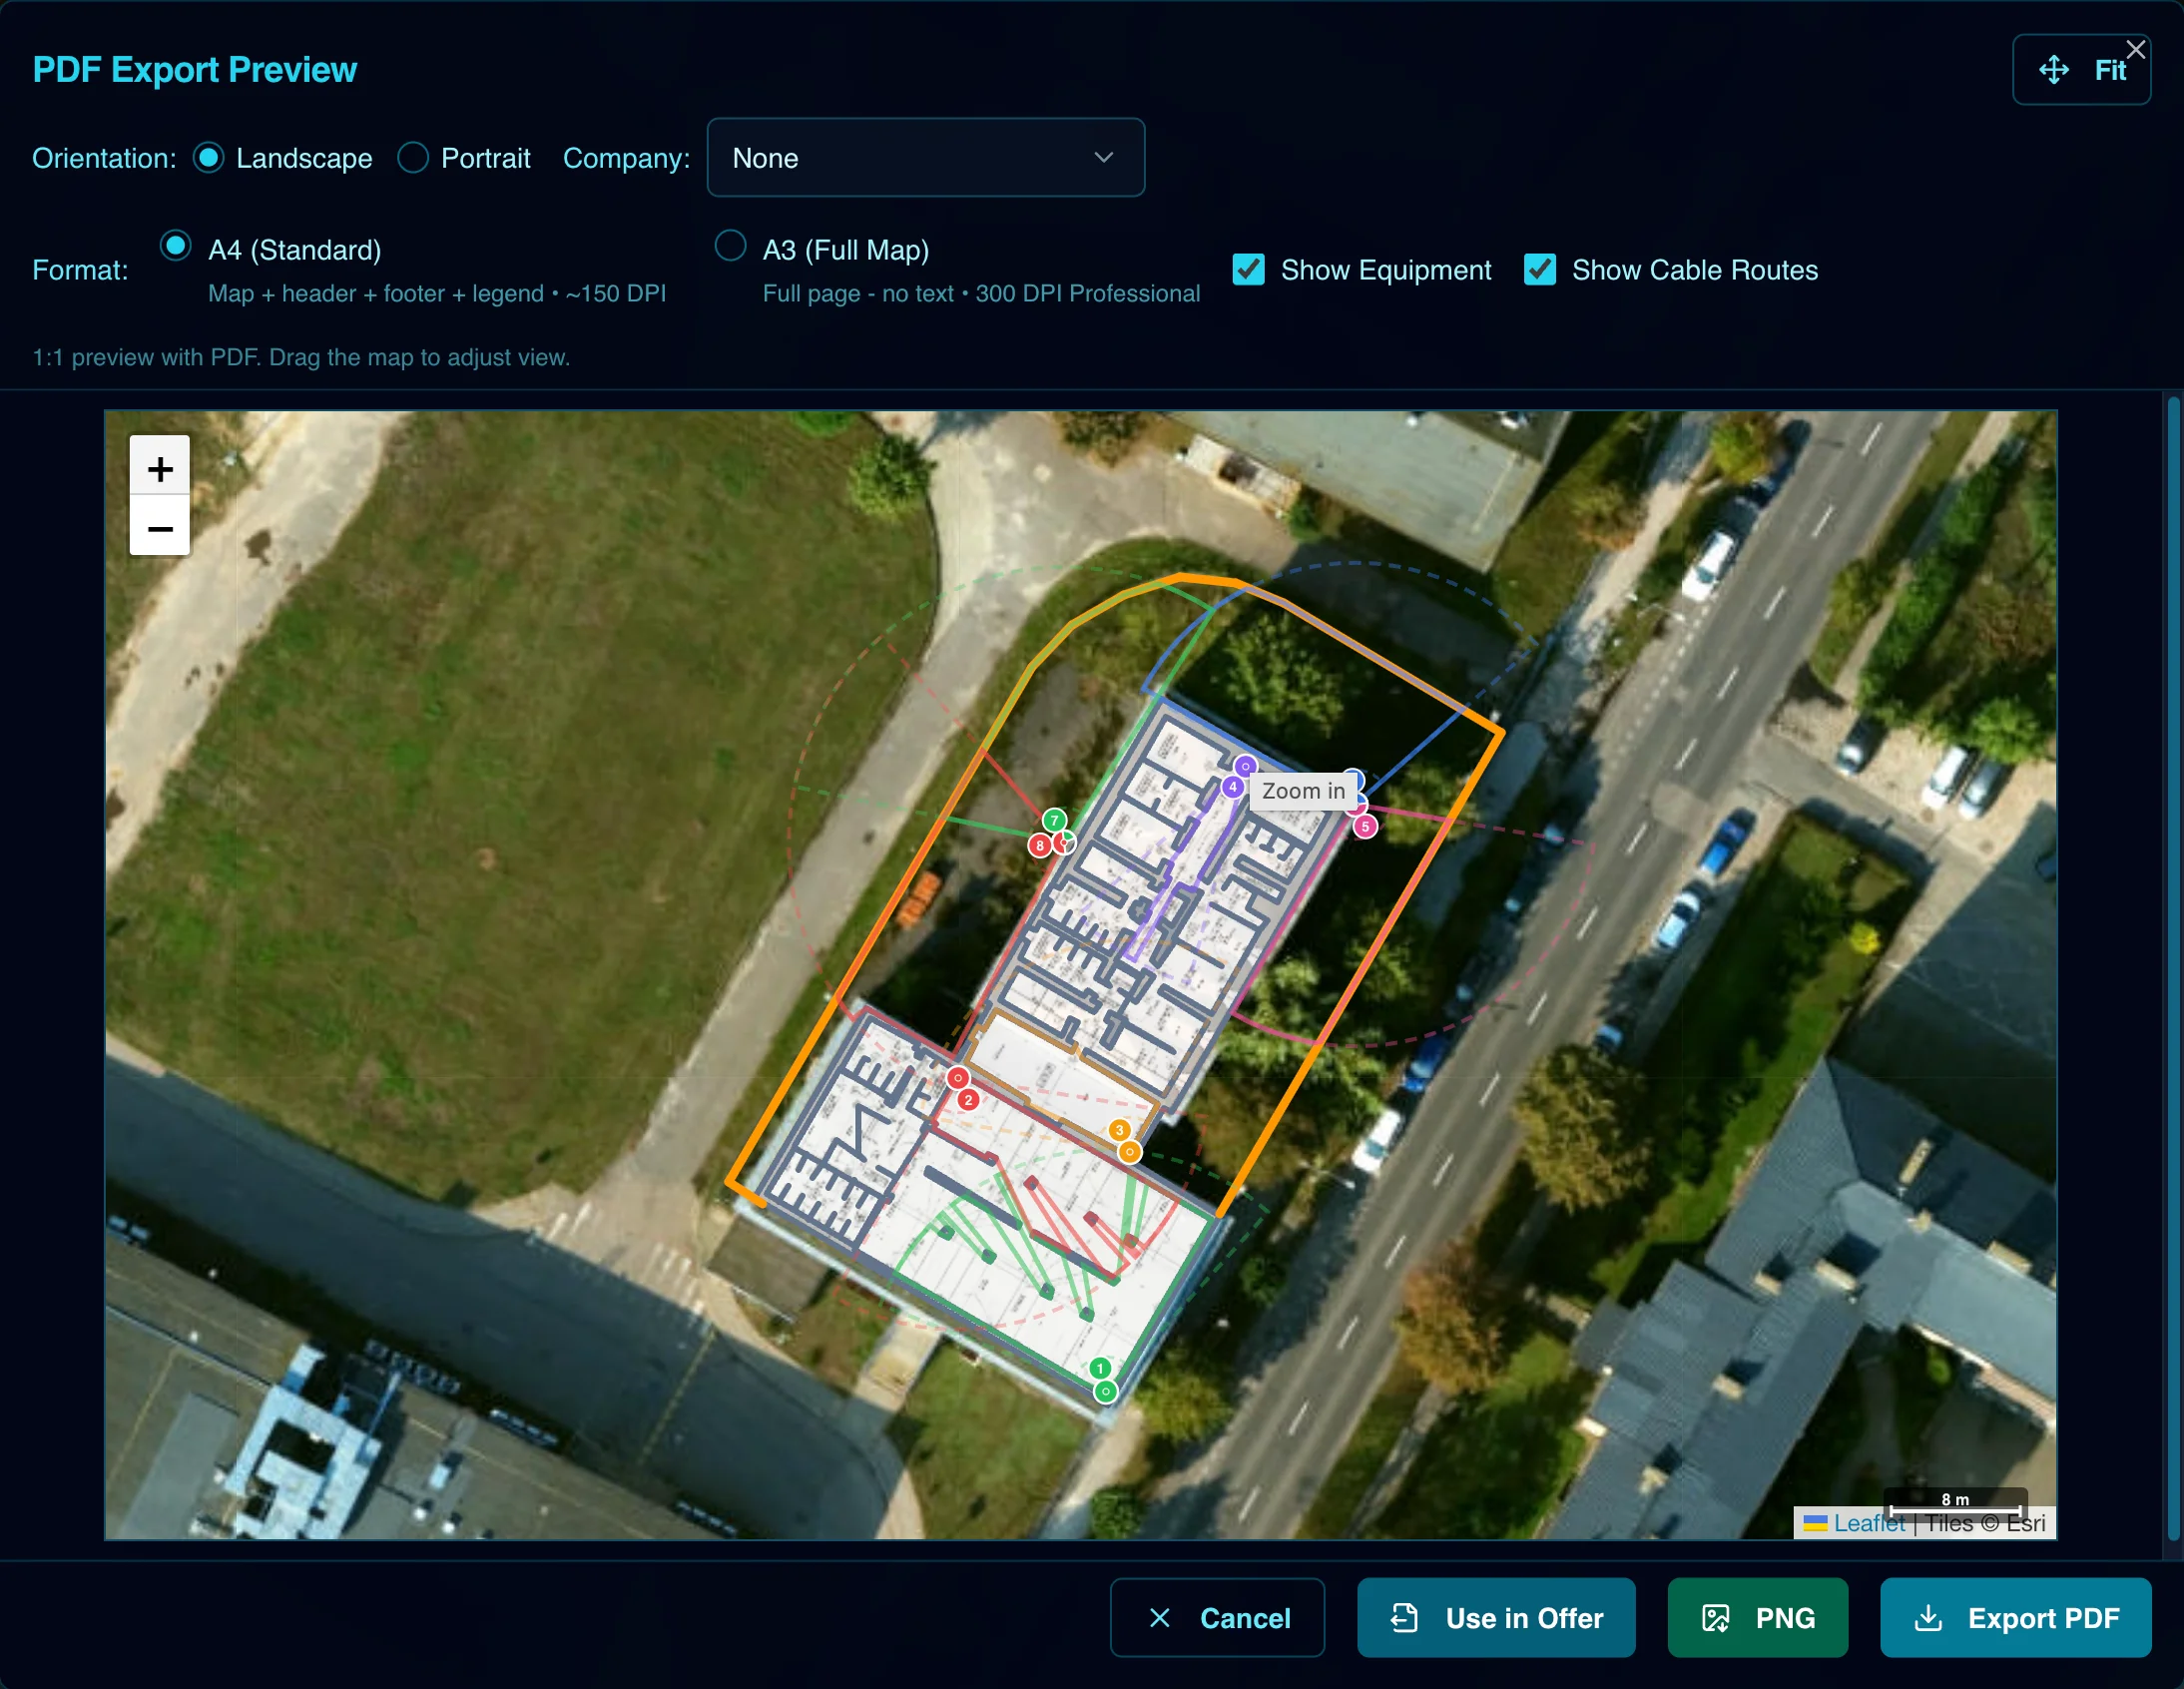
GPS accuracy on consumer devices is usually within a few metres, which is fine for most security camera placements. You are not trying to hit a manhole cover, you are trying to cover a loading bay. But if you are working on a high security site where every degree of camera FOV matters, you may want to use ground control points to calibrate the satellite image against known survey markers. That process is common in photogrammetry, where you measure distances on the image and compare them to real world measurements to correct for distortion. QGIS and ArcGIS both have tools for this, though they require some patience to learn. For most jobs, the built in measurement tools on Google Maps or Leaflet are good enough to get your initial layout within a metre or two.
Practical Steps for Satellite Map Camera Placement
Here is a workflow that has served me well across dozens of projects. It assumes you are using a browser based tool that lets you drop markers on a satellite view and draw camera FOV cones. Many free tools exist, including CCTVplanner, which is designed for exactly this kind of work.
- Load the satellite imagery for your site. Choose a recent image from your preferred satellite imagery provider. If the image has cloud cover or heavy shadows, switch to a different source like Bing Maps or a Maxar tile if available.
- Identify the key coverage areas: entry points, parking lots, loading docks, pedestrian walkways, and any blind corners. Mark them with placeholders.
- Drop a camera marker at each logical mounting position. Use the building geometry visible in the image to estimate height and angle. Most tools let you adjust camera FOV parameters like focal length and sensor size, so you can see the coverage cone on the map.
- Check for obstructions. Trees, adjacent buildings, and light poles all show up on satellite images. Draw a rough line from the camera to the farthest point in its FOV and see if anything blocks it.
- Export the coordinates and a screenshot of your map overlay. Take those to the site and verify each position. Adjust for real world conditions like wall material, conduit paths, and local sunlight patterns.
This method saves time because you do your thinking at a desk instead of on a ladder. It also gives you a record of your reasoning. If a client asks why a camera is pointed a certain way, you can show them the satellite map camera placement and explain how you arrived at that decision.
Dealing with Image Distortions
Satellite images are not perfect. The most common problem is parallax error, which makes tall objects appear to lean away from the centre of the image. In urban environments with multi storey buildings, this can shift a roofline by several metres on the map. If you place a camera based on where the roof edge appears to be, you might end up a floor too high or too low. The fix is to use a combination of imagery from multiple angles, or to overlay building footprints from OpenStreetMap which are usually digitised from orthorectified sources. Orthorectification corrects for terrain and sensor tilt, and you can recognise an orthorectified image by how straight the building edges look. Most major imagery providers now deliver orthorectified tiles, but older tiles in the same set may not be. Always check the metadata if it is available.
Another issue is resolution bandwidth. High resolution images cost more to capture and process, so satellite imagery providers often prioritise urban areas and leave rural sites with lower detail. If you are planning a system on a farm or a remote industrial yard, you might see only a blur where you need to see a fence line. In those cases, supplement the satellite view with a drone photo or a site walk. The satellite image still gives you the big picture, but you will need to zoom in on the ground for fine details like gate hinges or conduit runs.
Geotagging and Documentation
One of the biggest benefits of planning on a satellite map is the ability to geotag every camera position. Geotagging attaches real world coordinates to your camera markers, which makes installation faster and more accurate. The installer can load those coordinates into a GPS device or a phone app and walk directly to each spot. They do not need to measure from a corner or count bricks. This is especially helpful on large sites like warehouses or college campuses where the building orientation can be confusing.
I have also found that geotagged plans make maintenance easier years later. When a camera fails or needs replacement, the technician can look up the GIS coordinates, find the exact location on a map, and know which pole or wall bracket they are dealing with. It saves the half hour of hunting that usually happens when the original installer left no notes.
Limitations to Keep in Mind
Satellite map camera placement is not a substitute for a proper on site survey. It is a planning aid. The image cannot tell you if a wall is hollow or solid, whether there is power nearby, or if the building owner will allow a bracket on that facade. It also cannot show you the actual lighting conditions at night. A spot that looks bright in a midday satellite image may be pitch dark at 2 AM because the nearest streetlight is blocked by a sign. Always visit the site before finalising your camera positions and cable routes.
Another limitation is that satellite imagery cannot capture license plate details or facial features from the angles you need. That is a function of camera resolution and lens choice, not map accuracy. The map helps you place the camera, but you still have to choose the right hardware for the job.
Tools That Make It Easier
You do not need a GIS degree to use satellite maps for camera planning. Free tools like CCTVplanner are built specifically for this workflow. They let you load a satellite view, drop cameras, adjust FOV, and export a plan with geotagged coordinates. Behind the scenes, many of these tools use Leaflet or Google Maps for the map layer and rely on OpenStreetMap for building data. The combination gives you a planning environment that would have cost thousands a decade ago.
For more advanced work, QGIS is a powerful open source option. You can import satellite tiles, vector building outlines, and even LiDAR data if you need elevation models. ArcGIS has similar capabilities with a steeper learning curve and a higher price tag. But for the vast majority of CCTV projects, a browser tool with a good satellite image and a simple camera placement interface is all you need.
Final Thoughts on the Workflow
Satellite map camera placement is one of those techniques that looks simple on the surface but rewards careful practice. The first time you try it, you will probably place a few cameras and then realise the image scale was off or that you forgot to account for the roof overhang. That is fine. After a few iterations, you develop an eye for reading the terrain in the image. You notice the shadow of a pole that tells you its height. You see the pattern of a parking lot that tells you which spaces are reserved and which are visitor. You start to think in camera FOV before you ever leave your desk.
The real value is in the conversation it enables with the client. Instead of saying “I think a camera on that corner will cover the entrance,” you can show them a map overlay with the coverage area drawn in. They can see exactly what will be visible and what will not. That transparency builds trust and reduces the number of change orders later. And when you hand the installer a set of geotagged positions with GIS coordinates, you are not just giving them a list of spots. You are giving them a route and a reason for each camera. That is the difference between a plan that works on paper and a plan that works on the ground.